I ♥ Faces - Constructive Criticism Friday - No2.
Original.

Edit One (just a crop)


Edit two.


Edit three (change background colour)


Edit four (change colour shade and soften a little)


Edit five -can't remember!!


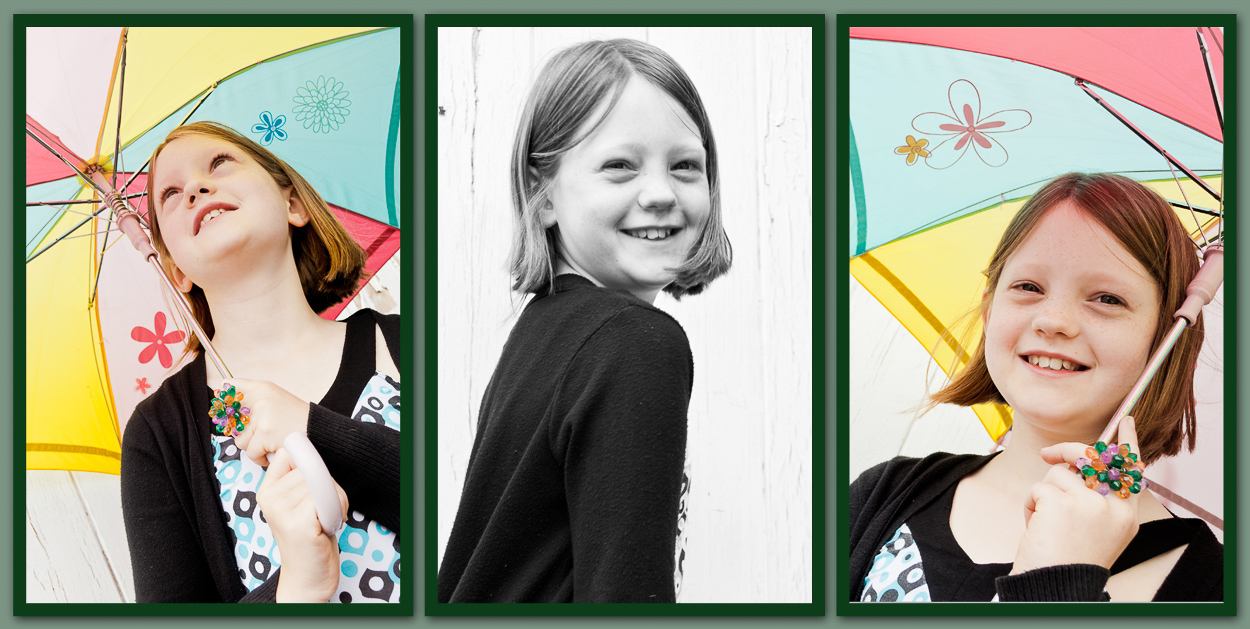
Edit Six - B&W faded & rotated


Edit seven - full B&W - straight.

Well, as this is CCF Friday again, which is all about learning what to do with 'problem' shots I thought I would chose exactly that. I had a number of shots I wanted to pick, so maybe those can keep for other times :D

Well, as this is CCF Friday again, which is all about learning what to do with 'problem' shots I thought I would chose exactly that. I had a number of shots I wanted to pick, so maybe those can keep for other times :D
One of my major problems is that I often seem to be shooting in crowded places, with either lots of people in the background, or general messiness (be that my messy garden, or messy house!). This means that my lovely faces are often hedged by unpleasent backgrounds - and that's a shame - I see it, but in many cases I have the choice to either let the shot go, or put up with it! :(
So here is a classic example. This was taken on the same occasion as my last CCF entry. What do you think of my edits this time? I did these a couple of months ago now and since then have learnt a little more about layering and masking, but all the same... All my editing is done in a combination of Gimp, Paint.net and Picnik. I think the majority of this was done in Paint.net and Picnik. I do all the layering in Paint.net and then use Picnik for effects and framing :D
I have posted these in the order I progressed through my editing. The first is the original and then the last three are 'final' edits - They were all a little different and I wanted my friends to choose which they liked best! :D
I just want to respond to a few of the comments regarding position and zoom. If you take a look at this following shot you will better understand the location of the couple I was shooting. It was not easy to change my position - I was standing at the end of this LONG table. It was an after-church meal with about 300 people milling about. I DID zoom as much as possible (camera limiting) and try to hedge-out some of the background. I DID take my time over the shot and alter my position a little. The only other thing I could have possibly done was to get a chair and stand on it - only I was in a doorway!! I was shooting on manual the whole day - and I had the aperture set as low as I could, but it auto adjusts for focusing. I guess with PROPER DSLR some of the limitations of my camera would be illiminated, but for now... Don't get me wrong, I am not saying my shot was perfect by any means and I am hearing all the wonderful advice I am getting :D
I hear the comments on background etc... Maybe I will give it another shot later tonight (if I have time with all the packing) and see what I come up with two months down the line!


Now click the button and take a look at all the other entries this week (and the comments of course) - there is so much to be learnt from these CCF fridays :D
OK - so here is EDIT 7 - advice taken on board. I've simplified the background and tried to 'feather' the edges more (although there is no feather in gimp that I've found) - I used fuzzy circle on a lowish opacity. I went back to the original exposure and skin tones and just slightly s curved to bring out shadows and highlights. Smoothed out skin with cloning and healing tools, but did not want to loose the reality of their age too much - to me that is part of the portrait :D. Just a slight rotation so as not to loose his head so much and didn't want to go back to pre-first crop and do all the selecting out again! Found the spot I'd missed on his neck too - although it took some finding! Any more work to do, do you think?


5 comments:
Wow! How fun! You did a GREAT job at masking:-)
I really like the crop of #6 (i might move up a little higher on his head though), background color of #4 and the original tone of their faces. In #4 their faces seemed too washed out.
With that tilted crop, you could probably just blur the background and it would look good with no colored background or just use a plain color without the texture. I tend to like simple backgrounds best when there is a lot going on with the patterns in their clothes.
I would also try to get rid of the small red spots on their faces.
What a cute couple! Looks like you are getting the hang of editing. Good job!
Amy
Co-Founder
I Heart Faces
Addressing the problem with shooting in crowded places ... recognizing the problem is the first step to solving it :). I really like the interaction you have here with your friends. They are relaxed and smiling and obviously pleased you are taking their picture. One thing you can do is take charge of the situation. Ask them to step outside with you and find a nice spot that has deep even shade and take the picture there. Another thing you could have done is move around the table until the busy background became less busy. Bend your knees and play with angles. See what looks best. Sometimes just a few inches up or down or side to side can really make a difference in the background. Then you could have zoomed in to just their faces and cropped out some of that background in camera. Tell them to put those faces closer together. I like to say, "Pretend you like each other and get closer!" If you camera has manual settings, you can set a larger aperture (lower number) and blur that background.
I read someplace (I read a lot, LOL!) that a famous landscape photographer was once asked the question, "What is the #1 thing I can do to improve my pictures?" And he said, "Get out of the car." I think about that a lot when I'm shooting. I need to move my feet. That's why I like prime lense, :D.
In critiquing your editing, I like the light blue backgrounds better than the purple. But I like the original skin tones without the softening. You've done an excellent job with the selection process. Is there an option for "feathering" the selection in GIMP? You might try 5 or 7 to see if you can soften the edge around the hair. It may make it blend more. And there one spot on the right of his neck where you missed. An easy fix :).
I do like your b/w conversion. Very nice.
I hope this helps!
Amanda J.
You captured wonderful facial expressions on both of these people.
I agree with the others that I prefer a more simple background though. Yours seems to overwhelm the subjects a bit. (Here is a link to a photo that I fixed for someone else that used a more subtle texture: http://www.flickr.com/photos/thearthurclan/3513736898/)
One other things to note: I think that some of the distracting elements could have been taken care of while you were shooting this photo and then you wouldn't have had to solve them with your photo editing program later. I would have a) brought the camera in closer to eliminate more of the distracting background elements and b) changed MY position to again get rid of more of the distracting elements in the background.
You are definitely on track though. I love your enthusiasm for photography and photo editing and all the steps you are taking to improve. It's a constant journey, isn't it? :)
~Angie
co-founder of iHeartFaces
You did an nice job of extracting the subjects from the background. Very impressive! That is something I struggle with. This makes a very nice portrait of these two. Especially considering the setting!
The tones of the light blue background look nice with the couple's clothing. By toning down the texture to something more subtle, I think it will be pleasing for a portrait.
Their expressions are lovely, and your focus is wonderful, even with them being on different planes. I like the softer look of edit 4, but I would bring back more depth by upping the shadows and midtones a bit. It is a little too flat. I would even out the skin tones also.
Thank you for sharing, and I'll look forward to seeing any further edits you make, and also just seeing more of your work!
Instead of adding a different background, I would try blurring the other elements of the photo, so it looks like you could have gotten those results straight out of the camera. I remember having this problem with the Power Shot (it was my first camera), but creating a layer and pasting in just the background, then adding a blur filter (It's gaussian blur in photoshop but I'm not sure what it's called in gimp) can give you the look you're after.
I would also probably run a sharpening action over their eyes, and then dodge the teeth a little to make them look lighter.
Hope that helps! :)
Post a Comment