Monday 30 March 2009

I heart Face - Week 12 - Pouting


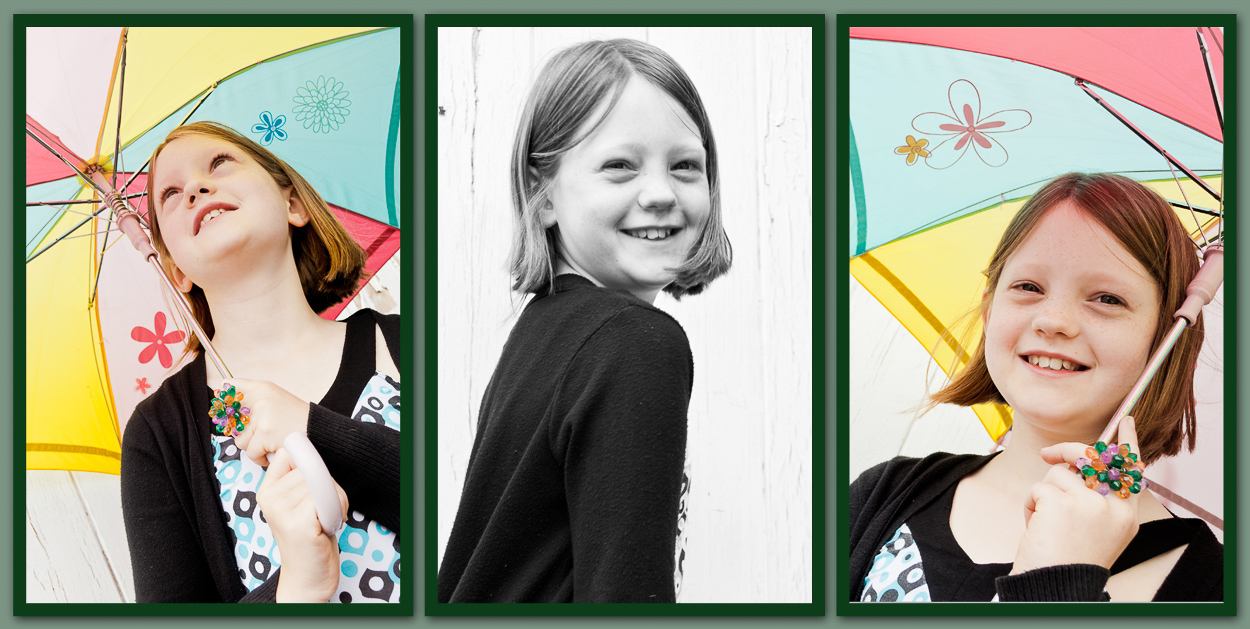
I took this the other evening, whilst trying to get some 'no flash' shots. It wasn't the best focus, but with a little editing..! Not sure why C. was pouting, probably just was! I didn't actually seem to have many pouty shots of my kids. I've been trying for weeks to get a few, but they simply hide their pouty faces when they see my coming - hehe! I Need one of those spy lenses from photojojo :)


And just for those of you who may have been looking at my photos for a few weeks now, Yes, my children's eyes ARE that dark. They are so dark brown that they nearly always shoot black. I haven't touched C's eyes in this picture at all - not sharpened, or brightened, or anything additional to that which I did to the picture as a whole. I love how glassey they look :)

Comments and criticisms welcome as always :D
Cx

"Be sure to go check out all the beautiful faces at www.iheartfaces.com!"

Friday 27 March 2009

Fix--it-Friday Beautiful Blues

Original

Edit One (well with a lot of saves along the way!)


Now for the HOW! 

My first response this week was... Ewww - tough one!! First things first was to lighten and brighten it all up so I could see what I was working with! Once that was done I felf her mouth was quite red and that was distracting from the eyes. I also did not like the colour of the background as it was too similar to her hair. I did try cutting her out at one point, and putting her on a more interesting background, but I simply do not have good enough software to make a good job of that - my edges are too sharp and obvious. So I abandoned that and went with taking the colour out of the backfournd/recolouring it instead. I hope you like my tweeks :D

Comments & suggestions are always more than welcome - good AND bad!!

Using PICNIK
  1. Exposure adjust - local contrast checked, Bright 47, Shadow 21, Highlight 18, exp 7, contrast 15
  2. Take into Paint.net lasso eyes and brighten then back to Picnik
  3. Sharpen a little
  4. Crop and Rotate so that eyes are in 2/3 intersection
  5. Clone teeth to whiten up
  6. Eye fix - select blue and fade to 56%
  7. shine be gone to nose and cheeks
  8. soften slightly and erase around eyes
  9. Ortenish - bloom 30, b&f both 50%
  10. B&W - fade 85%
  11. colours - pick eyes as neutral colour
  12. sepia - warm ++ (forgot to note the No.) and then erase from child.
  13. Exposure (again) - 18, contrast -10
  14. B&W (again) 69% fade with mid-blue filter
  15. Vignette - 26-25-46
  16. Frame - pick her left eye for outer frame colour (size 25) , inner size 11
Here is a collage of the main stops of the journey!!


No true B&W or sepia this week as I was trying to stay with the 'beautiful blues' idea, and bring out her lovely blue eyes. I nearly went with lots of blue in the background etc, but decided in the end that this would only detract from her eyes, rather than enhance them.

I think possibly I like stage 13 a little better than the end point of this fix - I can't decide!!

Don't forget to take a look at what other folks have
done with this lovely photo this week.

Tuesday 24 March 2009

No Flash - IHeartFaces - Week 11


Well, for those of you who have seen my kids entry this week, like son - like father :D


Here is my shot of my husband this Saturday. I particularly liked the reflections in his glasses. I haven't done too much to this photo either in terms of pp. Autofix, crop, cinemascope and add text - c'est tout!

He's getting a bit fed up of me putting photos of him on here though, so I'm going to have to find another subject soon! I can't help it that he has such a nice photogenic face ;) I nearly used two of a couple of my friend's this week, but this one won over in the end - again!


"Be sure to go check out all the beautiful 'no-flash' faces at www.iheartfaces.com!"

Monday 23 March 2009

IheartFaces - Week 11 - No Flash


Watching and Yearning...

This week has not been an easy pick. I was tied to outdoor photos as I only have a p&s atm which does NOT take pictures indoors without a flash. So outdoors meant very recent (old camera was not as good as even this one), or snow!! I entered a snow pic last week, so didn't want to do that again. I also wanted one with nice shiny eyes :)

This lovely photo was taken of my baby just this Saturday as he watched his siblings playing in a waterfall in the Lake District. I could see he was longing to join them - and he will soon enough of course.

I haven't done very much to this  photo - is was pretty good sooc, but I wanted to add 'effect' to it, so i simply auto-fixed, cropped a very little, sharpened his eyes a touch and applied a faded hoglaish (picnik), just to bring back the blues a bit. Vingnette, and frame with black and blue - and that was it.

What do you think?


"Be sure to go check out all the beautiful faces at www.iheartfaces.com!"

Friday 20 March 2009

Fix-it-Friday - Dimpled Darling.

How or why do you edit the perfect photo? Just for fun I guess..! This photo was absolultely gorgeous in the original, but it's always fun to see what can be done even with the best of photos :D


Edit one...


  • magnetic lasso to sharpen eyes in paint.net
  • into picnik
  • slight rotate and slight crop to bring in closer. I didn't want to lose the light on his hair though, just the tufts and the excess background above them!
  • sharpen whole picture just slightly.
  • exposure - advanced - check local contrast, but lower the strength. Up the shadows slightly and the highlights a fair bit. Up the overall exposure a touch and leave contrast alone. 
  • into create tab;
  • b&w - pick out red on shirt (missed the lion - oops!) and colour of background in original - apply
  • soften very slightly, but unsoften the eyes.
  • boost colour - just a touch
  • apply 1970's with round corners.
  • vignette very slightly (black)
  • frame with rounded frame, boarder, rounded frame - deep brown colour.
  • apply and save.
edit two...

The background was blurred enough, but it was distractingly yellow and I was having difficulty bringing the colour down without loosing to much colour elsewhere, so I decided to do something different altogether  - hope you like it :D


  • Fix eyes rotation and crop just as above (i was happy with that part!).
  • Then I sharpened and lightened it slightly.
  • Took into Paint.net to cut out Mr Dimples (magic wand) and saved as png.
  • Back into Picnik.
  • uploaded a background I had and dragged Mr Dimples onto it - and flipped him. 
  • Fiddled a bit with colours and contrasts (recoloured the background to hide the edging to the cut out better)
  • Added border
  • Added text.
  • Combine 
  • Sharpen the whole thing a stack
  • save :)

BTW - I always do my first edit or two before I look at anyone else's just to see what I can come up with!


Don't forget to take a look at what other folks have
done with this lovely photo this week.

Monday 16 March 2009

Going Green - I ♥ Faces week 10

This weeks theme has presented me with a real challenge. In the end I was down to two pictures for possible entry. This is the one that won the day. I hope you like it :D


If you're curious to see the loser see HERE.

It was not an easy choice, but this one was more 'green' and I especially like the way it contrasts with the white snow and the glow of the fur on her hood. The picture quality of the original was sadly not as good as I like to work with, but with a little enhancement (thankyou Picnik!) I don't think it makes a bad photo. Comments welcome - PLEASE - as ever :D

I'm not entering an adult pic this week - kids was hard enough and my only green adult photo I've already used on the messy week - and it wasn't a very good photo anyway!


"Don't forget to go and take a look at all the beautiful faces this week at www.iheartfaces.com!"

Friday 13 March 2009

Fix-it-Friday - Cutie Pie goes pink!


Cutie-Pie goes pink!

I can't wait for Friday's now!! This weeks was really a challenge though as it was already SOOO gorgeous!, but here's my take on it :D

This sweet little girl, I was convinced, would love pink!

Here's what I did - all in Premium Picnik :D;

I started by checking the 'local contrast' box, then upped the exposure, contrast & brightness just a little each (forgot to jot down the % -sorry). 

I cropped it - obviously!!

Then, in the 'create - effects' mode, I selected 'soften' and raised this, but I brushed over her eyes so as not to soften their sparkle. I had the brush very soft for this effect.

Next, I took it into black & white, but used a pale pink hue, at 36% fade. I toyed with bringing her lips back a little, but left it in the end.

I then selected the 'matte' effect - chosing a pale-ish pink, I set it to fade 68%, strength 84% and size 80% (until I liked the look of it basically!).

For the framing I used 'reflection' at full blur and fade, and then the 'matte museum' with a small pale pink inner frame - to help it look like a continuation of the photo-frame (or vice-versa).

I hope you like it :D

Feedback PLEASE!!
Cx

OK - so I learnt how do sharpen her eyes and then played some more... I think my favourites are the postage stamp and pink frame. 1 & 2 are with and without frame, as are 4 & 5, but do you notice the 'little extra' in the last one? What do you think? (Click on any one to see it bigger)


Don't forget to take a look at what other folks have
done with this lovely photo this week.

Wednesday 11 March 2009

For the Record...

Just for the 'passers by' amongst you these are some of the other photos that I played with the cropping of this week - I was pretty pleased with the results, but as ever, am happy to hear your critisms! I've put in the 'sooc' (straight out of camera) pics just so you can compare the before and afters :D

None of these got entered because I'd already submitted before I fiddled with them, howeve all but the odd B&W one would have been a strong contenders for entry imo - and even that one would have fitted well in the 'creative' straites! I guess I can always enter them when they 'fit' the catagory :D

We only have two P&S cameras in our house atm. The first picture was taken on my Canon A1000 IS and the other two on my Fuji Finepix F601Zoom. I am working at getting the most I can from these while I save up for a 'real' camera for myself and a bridge camera for my son (whose photography can be seen HERE) - and then we are going to take a course together to learn to do this all 'properly'!!

All of these below are all edited using premium Picnik alone.


Sunday 8 March 2009

Beautiful Dreamer - Creative Crop -kids

Beautiful Dreamer.


This is what I came up with in the end for my kids entry this week. I have been searching my photos for 'natural light' shots that I thought would appeal to this week's judge and also would make a good 'creative crop' entry - and I failed abysmally. All the same I hope you enjoy this crop and edit of my little man.

Any thoughts and comments I am only too pleased to hear - I am learning all this as I go along. I am VERY impressed with Picnik though.   I had to clone N's chin to lose the blanket - does it show? I have done a little editing in the past and this is by far the easiest 'make-over' program I have used to date :D

Here is the original;


Does anyone know though, of a FREE program where you can actually angle/rotate the crop field before you 'accept' it, rather than having to crop and then rotate (or vice-versa) - which I find a bit limiting in all honesty?

Don't forget to go and have a look at all the other wonderful 'creative crops' that people have come up with this week - over at www.iheartfaces.com!

Two heads - Creative Crop - adult entry.

TWO HEADS ARE ALWAYS BETTER THAN ONE!


This was taken of my two good friends one New Year when they had stayed with us and were about to leave.

Here's the original - I really went to town on this one!!


 All feedback and comments welcome - good and bad - let me know what you think!


"Don't forget to go and see what fun so many other folks have had with their 'creative cropping' this week - at www.iheartfaces.com!"

Saturday 7 March 2009

FIX-IT FRIDAY - Contemplation - I wonder


This is my second attempt at a fix-it and again I am pretty pleased with it :D I think I can actually edit pictures better than I take them!! When I played with the cropping and made him look upwards I felt that he looked as if he were sky-gazing and with the colours as I've set him it's as if he is watching the sunset.  


The blank space definately needed words - as others have done, but I felt it didn't need much - his face says it all.

So, what did I do..? Now that's the tough bit - remembering!
I know I did auto-exposure, then rotated and cropped. 
I played with the colours until I found what I liked.
There was a little sharpening and then a touch of softening.
I used the clone tool to remove the tear, as although I liked it, it didn't fit with my 'look' very well.
I warm-sepia-d the background (sepia, reverse & then paint the background)
Used the Matt effect (action) and chose the pinky colour for the edges.
Added the words.
Lastly, added the 'reflection' border - tweeked it - saved it - added a second!

I may have done other things too, but the ones I've detailed were definately the main ones. It's hard to remember what else I've done - I just click about until I see what pleases me :D

Hope you like it - PLEASE give me feedback - I'm pretty new to all this and need all the advice I can get!!

Caroline.

Don't forget to take a look at what other folks have 
done with this lovely photo this week.

Fit-It Friday - Red Head no longer.

I know this is weeks old, but I decided to have a play with Picnik ( free edition) and thought this photo would be a challenging test :) I was so pleased with my edits that I decided to upload them anyway, despite it being weeks ago. What do you think? 


Don't ask me what I did - I'm not really sure! I just played! I do know there was some cropping and rotating though :D My fav is the second one - it just seemed so unusual. I know I used the 'adjustable threshold' in the sandbox for that one, and then I just kept tweeking! In the second one I used sepia (reverse) to change the colour of the wood behind her, because when I had warmed her hair to a firey red it all seemed too much the same colour. I know there was some sharpening (for the eyes) and some brightening to ease out her extensive freckles - without losing the effect of their beauty all together.


Click here to see the other folks edits of this week's Fix-it Friday :)


Wednesday 4 March 2009

Mr & Miss Messy

I had to find my entries in a hurry this week as I didn't know you'd changed the closing day - until today! So these are unedited. I wanted to concentrate on editing my beginners entry more this week - where I think I really am at in all honesty! Still these photos are fun, so enjoy :D

Adult entry


Paul feeling a little 'ogrely swamped!!' 

Sadly this picture is not in good focus and there's not much I can do about it, but it's still fun and VERY messy!! 


Kids entry;


This is a SOOC shot taken a couple of years ago - it's not too bad though :D


"Be sure to go check out all the beautiful faces at www.iheartfaces.com!"

Tuesday 3 March 2009

SOOC

Messy


"Do I LOOK bovered!!"

This was taken of my daughter a couple of years ago after she had had some fun with spaghetti bolognese! This little mess led to the invention of the verb "to deorangify" in our household!

PLEASE PLEASE take a look at the SOOC shot (it's HERE) just so you can see what I started with :D

How did I do with my editing then? I only have free-editing software (paint.net, GIMP and photoscope) and I am trying to learn more about how to use each of them. So far I think I like paint.net. I'm quite pleased with the overall results of this edit - especially the improvement in the brightness of her eyes and the loss of my son in the background, but what else do you pro's recommend ;) There are things I would still like to do (like crop out the extra sparkles on the top of her head, take out the odd bit of white below her right ear and I've spotted a residual bit of blue cup lurking there too!), but my husband needs the computer with the software on now, so my time is up! :( Other than that...does she need something extra around her left eye? Is there too much red? Is there enough contrast and depth? Are the colours/lighting too dark?


"Be sure to go check out all the beautiful faces at www.iheartfaces.com!"

I ♥ FACES

I ♥ FACES ~ WEEK 10 - “JUMP FOR JOY!”

I ♥ FACES - Week 7 - "I Wanna Dance!"

I ♥ Faces - Week 2- “Best Face"

I ♥ Faces - Week 27 - Pets

I ♥ Faces - Week 31 - "Crazy, Silly, Funny Faces!!"

I ♥ Faces - Week 35 (ii) - “PhotoJournalism"


Social Butterfly Award :D

Ten Minutes From Home

TMFH
Capturing Your Memories

Communal Global

You Capture

Photobucket

5 Faves Friday

FFFpub copy
<center><a href="http://frog-photoblog.blogspot.com/search/label/5FF"><img src="http://farm3.static.flickr.com/2776/4427279169_ddd077ec9b_m.jpg" width="212" height="240" alt="FFFpub copy" /></a><center>

BEST SHOT

Photobucket

SOOC Saturday

Followers

Recent Visitors

Instagram Gallery

  © Free Blogger Templates 'Photoblog II' by Ourblogtemplates.com 2008

Back to TOP